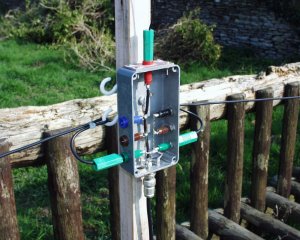
It consists of a vertical quarter-wave section supported by a telescopic fibre-glass fishing pole which, as I discovered, could be bought very cheaply from the local fishing tackle shop. There are two (or more) quarter-wave radials as well, and both radials and vertical can be very easily changed for different bands. The detail of the junction box may be seen in the picture, and is really the heart of the whole thing.
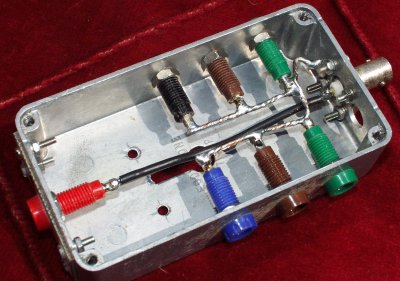
The photo shows detail of the inside of the junction box. It has a 50 Ohm BNC socket mounted on the bottom wall, and some 4mm sockets on each side, the latter being used to connect various radials which act as the ground plane. Another 4mm socket is mounted on the top wall of the box to connect the vertical quarter-wave element. Radials can be made from thickish stranded insulated wire whilst the vertical is from thinner wire to enable it easily to be wrapped around the fishing rod, thus preventing it from flapping around in the breeze.
The box is mounted on a piece of 25cm square wood using a bolt head which slots into the rear of the box. The box itself may be metal or plastic - I chose an old die-cast aluminium box for my antenna. I have also used some cup hooks, screwed into the wood, on which the radials will hang. (See photo). Radials for more than one band may be attached at any time. The idea of this antenna is to make it very portable, and all parts can be very quickly assembled and dis-assembled.
Connections inside the box are straightforward. (see photo below). All sockets for radials are joined in parallel and connect to the outer of the BNC socket. The inner conductor of the BNC is connected directly to the top 4mm socket (red in photo) for the vertical element. Keep all connections a short as possible, and use stout gauge wire for this.
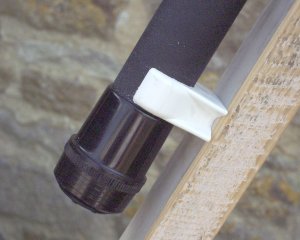
A photo of the mounting method for the fishing rod is shown below, left. 28mm central-heating pipe clips are screwed to the wood, these allow easy fitting and removal of the rod.
The picture below, right, shows better detail inside the junction box. The slotted fixing hole can be seen just left of centre.